Fall is a great time to test garden soils.
There is one aspect of our gardens that is often overlooked and may underlie many of the problems we experience in our soils. Fall is an excellent time to reflect on the past growing season and look toward next spring’s gardening opportunities with the lessons from this year in mind.
Productive soils
Soils need attention to remain productive, but how often have you taken a quantitative measure of soil fertility and other soil attributes? A soil test is an excellent way to gauge current soil productivity, discover soil issues, and plan for maintenance of soil health through the addition of appropriate soil amendments. These tests are relatively inexpensive and provide valuable knowledge and insight into our soils.
Runoff
Overfertilization and the subsequent offsite movement of excess nutrients into our streams and rivers is a major water quality issue nationwide. Although a large amount of this non-point source pollution is typically attributed to industry, it is still important for smaller-scale lawn and garden applications to stay within recommended limits. In recent years, some research has shown alarmingly high levels of nutrient runoff from urban areas. Soil tests and proper fertilizer applications ensure we're doing our part.
Soil testing tips
- Separate samples of areas where plants thrived from those that did not and compare the results.
- Test areas where you plan to plant different crops next year.
- For overall soil health testing, collect sampling from across the area.
- Combine individual samples into a plastic bucket and mix well. Do not use a metal bucket or rusty spade. Galvanized products skew the test results with added zinc.
- Remove one cup of the mixture and submit it in a plastic bag. Label the bag with your name, date, and type of soil, such as "garden" or "lawn."
- Check out the list of approved labs.
Tests you can do at home
There are many different resources to determine the texture of your soil. The simplest and most generic method is the feel test; rub a moist sample of soil between your fingers. Sand will feel gritty, silt smooth, and clay sticky.
Another test is the ribbon test: squeeze a small, moistened ball of soil between your thumb and forefinger to create a ribbon.
- Sand or sandy soils won’t ribbon; loam, silt, silty clay loam, or clay loam soil ribbons less than 1 inch
- Sandy clay loam, silty clay loam, or clay loam ribbons 1 to 2 inches
- Sandy clay, silty clay, or clay will ribbon more than 2 inches
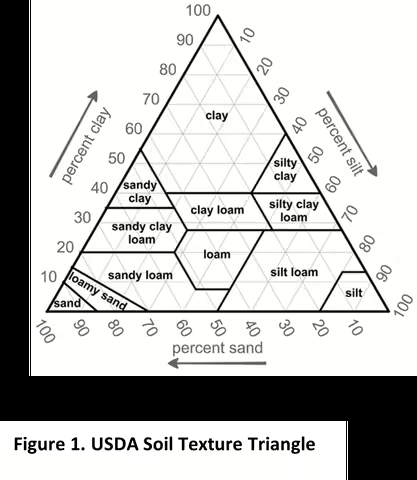
There are other tests available, such as the jar test and ball squeeze test. Get to know your soil and try one of the at-home texture methods. The NRCS has a nice flow diagram to help with determining your soil texture. The USDA Soil Texture Triangle could also be used when determining texture.
Understand the pH and nutrient availability
In addition to soil texture, it is vital to know and understand the pH and nutrient availability of your soil. Soil pH and nutrient availability can be assessed through a soil sample. Check out our section that details how to sample your soil for sending off to a soil lab.
| Crop | 5 | 5.5 | 6 | 6.5 | 7 | 7.5 |
|---|---|---|---|---|---|---|
| Asparagus | ||||||
| Bean | ||||||
| Cabbage | ||||||
| Carrots | ||||||
| Corn | ||||||
| Cucumber | ||||||
| Kale | ||||||
| Lettuce | ||||||
| Mustards | ||||||
| Onions | ||||||
| Parsnips | ||||||
| Peas | ||||||
| Pepper | ||||||
| Potatoes | ||||||
| Radishes | ||||||
| Spinach | ||||||
| Squash | ||||||
| Tomatoes |
Soil sampling is not something that needs to be done every year. Ideally, it would be done every 3 years. Soil pH is a measure of acidity or alkalinity with an ideal soil pH of 6.5; the pH ranges from 6.0 to 7.0 is ideal for most garden vegetables. See Figure 2 for pH specifics for different vegetable crops. Soil pH can be raised (more alkaline) with the addition of lime or lowered (more acidic) with the addition of sulfur. Raising and lowering your pH does take time; once lime or sulfur is applied, it can take a year or more to see any movement in pH.
The soil test also provides information about the level of nutrients available. Depending on the soil test you choose, Phosphorus, Potassium, Magnesium, and Calcium are the most common nutrients you will receive information about. Nitrogen is an essential nutrient; however, it can be very mobile within the soil with values changing constantly which is why it is not included in a basic fertility test. Nitrogen is also the nutrient that plants need in the largest quantity.
When organic matter is broken down in the soil, nitrogen is available for plant use. The nitrogen from organic matter usually is not adequate to meet the demands of many vegetables, so additional nitrogen from fertilizer is needed. If the organic matter level is high or manure has been applied, the only added nitrogen fertilizer needed is for vegetables that benefit from high levels of nitrogen which includes sweet corn, cole crops (broccoli; cabbage; cauliflower; kale; Brussels sprouts), and leafy green vegetables.
It is recommended to apply one or two applications of nitrogen as a side-dressing after planting for these crops. For soils high in phosphorus (25 ppm or higher), no phosphorus fertilizer is suggested. Crop yield is not likely to be improved by applying additional phosphorus on high-phosphorus soils, so there is no benefit from its use. Potassium levels of 125 ppm and above are considered high and no additional fertilizer should be added. Other nutrients (calcium, magnesium, boron, etc.) are not known to be deficient in most Illinois soils, so it is not recommended to apply these nutrients; however, if issues arise within your garden, it is typically a good idea to test for micronutrient deficiencies.
Nutrients can be added to soil in many forms, the most common being manure, compost, or commercial fertilizers. Manure and compost are nice options as they also add organic matter to the soil. Applications of fertilizer should be made based on your soil test levels.
For more information or any questions about soil management, contact your local Extension office.
From: The Garden Scoop by Ryan Pankau, with supplemental information from Katie Parker