
Pressure canners provide the only safe heat-processing method for preserving low-acid foods, such as green beans, meats, squash and pumpkin, and stews, soups, and broths. Only pressure canners can reach the required temperature of 240 °F to kill the deadly, highly toxic pathogen Clostridium botulinum.
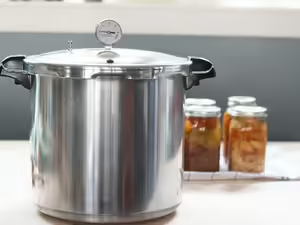
Pressure canners come with either a dial gauge or weighted gauge, a gasketed lid, a one-piece safety counterweight, a steam vent (port), and a safety fuse; most modern canners include a removable inner rack.
Pressure canners are different than electric pressure cookers. Extension does not recommend using electric pressure cookers for canning. Make sure your canner has the Underwriter’s Laboratory (UL) approval to ensure safety; check the product manual or box.
Pressurized steam inside properly working, sealed pressure canners lets the water inside heat to higher temperatures than boiling water canners can achieve, which will never be more than 212 F. at sea level regardless of how long the water boils.
It is important to know your elevation in order to make adjustments needed. Most of Illinois is at sea level, but pressure adjustments need to be made at elevations more than 1,000 feet above sea level to reach correct temperatures. Each tested recipe will provide instructions for the elevation adjustments.
Conditions that can cause processing errors include a mismatch between elevation and pressure required, improper venting that causes air to be trapped in a closed canner, or an inaccurate dial gauge.
Pressure Accuracy
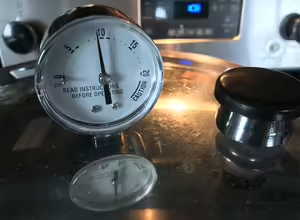
Accurate pressure is critical to safely preserve foods. Over time, a pressure canner's dial gauge can change and give a false pressure reading. If a pressure dial reads too low, a high enough temperature will not be reached to destroy the bacterial spores created by C. botulinum. If the pressure dial reads too high, over-processing will occur and impact both the quality and texture of the product. Replace a pressure dial gauge if it is off by more than 2 pounds.

Pressure Canner Testing
Annual Testing: Dial Gauge Only
Test dial-gauge pressure canners every year to ensure accuracy. Pressure canners with weighted gauges do not need to be tested. We make it easy by providing free testing around the state. Contact your local Extension office to find the closest canner testing location or sign up for our free text program to receive a yearly email or text reminder to have your dial-gauge pressure canner tested.
Lid Care
Inspect and clean pressure canner lids so they will seal properly, which is critical to ensure a high enough temperature will be reached to destroy the bacterial spores created by C. botulinum.
- Thoroughly clean lid after each use, keeping it free of food and hard water residue.
- Clean edges of lid and inspect vent port (steam vent) to ensure it has not become plugged.
- Inspect gaskets for cracks.
- Replace any brittle gaskets or gaskets that do not fit properly; they will not be able to maintain a seal.
- Purchase new seals at hardware and home improvement stores or by contacting canner manufacturers.
Prepare to Pressure Can
Food safety starts at harvest. If harvesting from a garden directly, wash hands before harvesting and use a food-safe container to collect the produce. Brush dirt or debris off produce immediately. Wait to wash produce with clean water right before using it.
Fill the Canner
Pour 2 to 3 inches of water into the bottom of a clean canner before placing any jars. Generally this equals 2 to 3 quarts of water, but follow canner manual for exact measurements. If you have hard water, add ¼ to ½ cup white vinegar to the water to help prevent mineral buildup on the jars.

Prepare Jars and Lids
Use regular or wide-mouth Mason-style jars, following the tested recipe's recommendations for jar size. Inspect jars to make sure they are free from scratches, nicks, or any other damage. Wash jars, lids, and rings using hot, soapy water. Rinse after washing. Do not boil lids; they no longer require simmering to ensure a seal. Keep jars hot before filling with product. Set clean jars into open canner and fill them with boiling water.
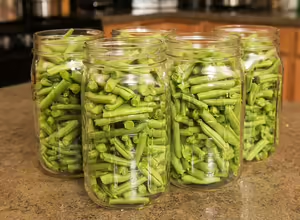
Prepare Product
Wash hands and produce, then peel or prepare the food as directed by the tested recipe. For most solid-textured vegetables, wash them again after peeling and cutting them. Fill clean, hot jars with product.
- Hot Pack: Fill hot jars with hot product.
- Raw Pack: Fill hot jars with raw product and cover with boiling water, leaving appropriate headspace.
Free bubbles with a plastic knife or bubble freer tool, measure headspace, and wipe rims with damp paper towel. Place lids and tighten rings (finger-tight). Do not overtighten rings.
Process the Product
Place filled jars in canner of simmering water, lock the canner lid into place, and turn stove on the highest setting. Watch for a free flow of steam, and then allow the steam to flow for 10 minutes. Place pressure regulator on the petcock to let the canner build up pressure. Start a timer once canner is at pressure and follow the recipe directions for processing time for the jar size at elevation. After processing time is complete, turn off the heat source and allow the canner to depressurize (the gauge will read zero). Wait 5 minutes, then remove the lid and remove jars from the canner using a jar lifter. Let jars sit undisturbed for 12 to 24 hours before storing in a cool, dark, dry location.