Irises are easy to grow, long-lived, and relatively carefree perennials, making them some of the most popular flowers in gardens. They can also be found in a variety of colors, ranging from pink, purple, yellow, peach, green, white, tan, bronze, to almost black, and bi-color.
The American Iris Society divides irises into three main classifications: bearded, aril, and beardless Irises. The most common type of iris grown are bearded irises.
When and why should I divide bearded iris?
If you grow bearded irises, you may have noticed that over the years, your clumps of iris begin flowering less and become crowded. Despite being relatively carefree, bearded iris, and other irises that grow from rhizomes like Siberian and Japanese iris, should be divided every three to five years when flowering begins to decline, or the clumps become crowded. This will help keep the irises blooming and help prevent issues with iris borer and soft rot.
While they can be divided any time after they are done blooming, July and August are the best time to divide. This will give the new rhizomes enough time to fully develop before they are divided. It will also provide the plants with adequate time to produce new roots and establish themselves before the arrival of winter.
How to divide bearded iris
When dividing iris, you want to lift the entire clump with a spade or digging fork. Once you have the clump lifted, remove as much soil as possible from the roots and rhizomes. If your iris are growing in heavier soils, it may be helpful to use a hose to remove the soil.
You’ll also want to cut back the leaves to about one-third of their height. This will make the plants easier to work with and help reduce water loss while plants are establishing. This can be done before or after you lift your clumps.
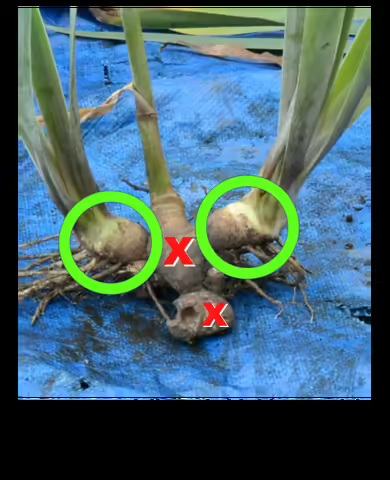
Rhizomes can be broken apart by hand or cut apart with a clean, sharp knife. If a knife or pruners are used, make sure to sanitize them with a ten percent bleach or disinfecting wipes. When dividing, your new transplants (rhizomes) should be
- Firm and light-colored
- At least 3 inches long and about as thick as your thumb
- Have healthy roots
- and have a fan of leaves (at least 4-5 leaves).
Remove and discard the old rhizomes and only save the newer ones that grow off the older parts. If you find rhizomes that have iris borer damage, are smelly or mushy (soft rot), discard these rhizomes too.
Planting bearded iris
You’ll want to plant your rhizomes relatively soon after dividing (it’s okay to wait for a few days). Bearded irises will grow best in full sun locations that have at least 6-8 hours of sunlight a day. They also prefer to grow in well-drained soils. If the soils stay too wet, this may lead to the rhizome rotting.
Once you’ve selected your location, you can add organic matter or other amendments if needed. To determine if you need to amend your soil, it would be a good idea to conduct a soil test.
When planting iris, dig a hole about four inches deep with a small mound in the middle of the hole. Place the rhizome on top of the mound and let the roots fall down the sides of the mound. After spreading the roots out, cover them with soil, so the rhizome is just slightly exposed. Do not plant the rhizome too deep because this can lead to issues with root rot.
Generally, bearded irises are planted 12-18 inches apart, with the fan of leaves facing the same direction. If you have multiple cultivars, plant the different types in groups of three to seven rhizomes.
After planting, water your iris and keep the soil moist (but not too wet) until new leaves begin to emerge. Some people will mulch newly transplanted iris in late fall with straw or pine needles to help prevent heaving. If you decide to do this, make sure to remove the mulch in early spring so the soil can dry out (as you may have guessed by now, this will help prevent rot).
Your transplanted iris may only bloom sparingly in their first year, but you should end up with a beautiful display in subsequent years.
Good Growing Tip of the Week: While we typically plant irises 12-18 inches apart, you can plant them close together if you want an area to fill in faster. However, if you plant your irises less than 12 inches apart, you will likely need to divide your plants every two to three years.
Don't feel like reading? Watch instead!
Want to get notified when new Good Growing posts are available? SIGN ME UP!
Meet the author
Ken Johnson is a Horticulture Educator with University of Illinois Extension, serving Calhoun, Cass, Greene, Morgan, and Scott counties since 2013. Ken provides horticulture programming with an emphasis on fruit and vegetable production, pest management, and beneficial insects. Through his programming, he aims to increase backyard food production and foster a greater appreciation of insects.