Hydroponics continues to be a popular topic in the horticulture industry, but usually it is on a very large greenhouse scale.
Why is it so popular? Well, it's because your plants can grow 30% to 40% faster. And it is just pretty darn cool.
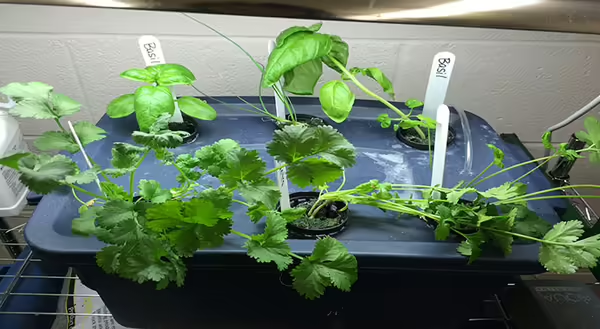
Did you know that you can build a hydroponic system at home?
This particular system you can build is a passive hydroponic system, meaning that nutrients, which are in a fluid solution, are drawn up and absorbed by the growing medium — a wick or some other device — and passed through contact to the roots.
An active hydroponic system would rely on pumps and other mechanical devices to actively move the solution to the roots, which requires more equipment and setup.
Download this fact sheet for more information about hydroponics, growing mediums, system types and more: Home Hydroponics
DIY Passive Hydroponic System
Supplies
- Plastic container with lid (from any home store)
- Seeds (I use a lot of lettuce and other herbs)
- Rockwool growing medium (online from various sources or hydroponic stores)
- Plastic net pots (online from various sources or hydroponic stores)
- Hydroponic nutrient solution (I used CNS17 commercial nutrient solution from Botanicare)
- Aquarium air pump (from any pet department)
- Aquarium tubing (from any pet department)
- Air stone (from any pet department)
- Supplemental lighting
- Ph test strips and EC meter
Assembly
- Take a plastic container and cut holes in the top to hold the plastic net pots.
- Start seeds in rockwool cubes and then place these rockwool cubes in the net pots. The rockwool serves as the growing medium and wicks up the nutrient solution.
- Fill the container with a hydroponic nutrient solution at a great enough height that the rockwool cubes are suspended in the solution.
- Make a hole at the top of the container so that the plastic tubing can reach the water. On this end of the tubing, the air stone is connected.
- Attach the air pump to the other end of the plastic tubing; this serves as a way to oxygenate the water. Without this setup, the roots of the plant would not get enough oxygen to grow while buried in water.
- Place supplemental lighting within 1 to 2 inches of the plants and leave on for 14 to 16 hours a day. Change the nutrient solution and clean out the container every two weeks
- Ideally, weekly pH and EC readings would be taken to make sure the pH and nutrient levels are within the correct range for the plants you are growing.
- Whenever your plants are large enough to harvest, go ahead. The great thing about growing the lettuces and herbs is that I can harvest only a portion and the plant will continue to produce for many months.
Want to get notified when new Know How Know More posts are available? SIGN UP HERE
Know How Know More: University of Illinois Extension is the original go-to source for growers, DIYers and jacks of all trades. For more than a century, Illinois Extension expert educators have shared university research in communities across the state. Get advice you can trust on horticulture, agriculture and nutrition in the Know How Know More blog. Build your best life. Trust Extension to help.
Candice Hart is the University of Illinois State Master Gardener Specialist. She was previously the horticulture educator for DeWitt, Macon and Piatt counties.
Doug Gucker is an Illinois Extension Local Food Systems and Small Farms Educator serving DeWitt, Macon and Piatt Counties in Central Illinois. He is a Certified Crop Advisor and works to help producers improve their profitability and sustainability with programs and feedback on farm management strategies, soil health, nutrient management, integrated pest management and grazing. Find Doug on Twitter at @SoilWaterDoug, by email at dgucker@illinois.edu or call 217.877.6042. Subscribe to his podcast Out Standing in the Field wherever you listen to podcasts.