Spring is a great time to be adding fruit trees to the backyard. Apple, peach, pear, cherry, and so many others are great additions. If you are a market grower, you may have customers asking about tree fruit and it may be time to finally decide on purchasing and plantings trees. Today's blog post comes from my own experience as I planted two dwarf peach trees, ‘Contender’ and ‘Reliance’, at my house and thought I’d share the basics of planting.
Two things to do before planting:
Call JULIE
You should contact JULIE before digging and planting a tree/orchard. This free service alerts utility companies of what you will be planting, where you plan to plant, and how deep you will be digging. It ensures that you do not damage utility lines underground. They send out individuals to place flags to where the utility lines are. I did this last week before planting my fruit trees as I’ve moved into a new home and did not know where the utility lines are. The turn-around for this can be a couple of days.
Get a soil test
This will take a bit longer (usually 2 weeks) but a soil test will ensure that your trees have their soil needs met. It’s especially crucial for the soil pH as that’s hard to change once you’ve planted your trees. This soil pH needs to be somewhere between 6 to 7 pH. You may have nutrient issues that you would not know without getting a soil test. University of Illinois Extension maintains a list of soil testing labs website which you can find here. Typically, you are sending a ½ cup of soil from your respective growing area.
What if your trees arrived and you are not ready? Place in a garage/cool area for the time being. The trees you’ve purchased should be dormant/able to withstand 1-2 weeks in an unheated area of your home.
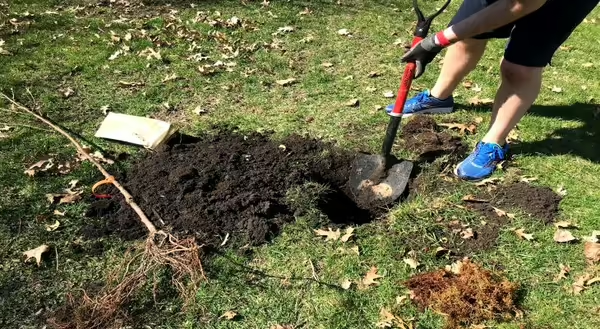
Now to planting:
Site Selection
You are after full sun for your fruit trees. Keep in mind any future shade from nearby trees and shrubs that may have not leafed out yet. Avoid frost pockets where the slope of your property may ensure that it stays colder. For Northern Illinois, you might consider a wind break with any nearby buildings or plants. This does not mean it needs to be planted closer to this, but with our winter temperatures, I have anecdotally observed a windbreak to sometimes assist fruit trees in providing one form of winter protection.
Spacing
As a rule of thumb, your trees should be planted based on their expected height, from center of trees. For dwarf trees, this is 8-10 ft. For semi-dwarf trees, this is 12-15 ft. For standard, this may be 20 ft or more. Remember this is permanent. You want to make sure that this is where you want this tree. My dwarf trees are spaced 10 ft.
Depth
The tree hole needs to be as deep and wide as the roots that your tree currently has. Ensure that when you plant the tree roots that they are not ‘balled’ up. For one of the peach trees, I had to dig much deeper due to it’s substantial root system compared to the other tree. The width of the hole that I planted is 3 ft.
Planting
One of the main challenges you may have is the grass. Once this was cut back and removed, I was able to dig in and create the hole I needed. With the soil at the side, I mixed in compost/broke up any clods which would be added back to the hole.
Soak your tree roots in a bucket of water before planting at least 1 hour. This can keep the roots from drying out and allow them to potentially get a head start. It will allow you to see any damaged roots that can be cut out too.
Ensure the graft union is 2-3 inches above the soil line. Most fruit trees these days have a graft union which is a small growth/knob a couple inches up from where the roots of the tree begin.
Place your fruit tree in the center of the hole. Add the soil-compost mixture you created. Keep ensuring that the graft union is staying 2-3 inches above the soil line. Once you’ve reached the top and covered the roots completely, firm the soil up slightly and ensure that it is level. Ensure that any stray roots are covered completely or pruned out. Do not place grass back on top. You want this area to be weed free as much as you can.
Water your trees at planting. This may be between 1-2 gallons of water, slowly applied. Ensure then that you are receiving 1-2 inches of water every 10 days during the season for your trees.
While you may be tempted to place wood chips around your tree, you should recognize that this may attract wildlife and provide them with protection to then damage your trees. You would be better off keeping this area uncovered.
Next steps:
Check-in with your tree
After planting, check in with your tree to ensure that things are going as planned. You may find that the tree has sunk and the graft union is closer to the soil line. In which case, you may need to raise your tree up. You could find initial wildlife damage and need to provide protection. I have found that my tree is slightly off-center and I need to provide support.
Add support
Almost all fruit trees will benefit with staking and support. For a dwarf and semi-dwarf tree, both of these will need staking their whole life. With my two peach trees, they arrived with 1 bamboo stake and I will need to purchase another one.
Protect from wildlife
Depending on where your trees are, you may need to protect these trees from wildlife damage. Deer, rabbit, and others tend to be nuisance on young trees. You may need to create a barrier that keeps wildlife from getting to the trees. While you may not need it right now, you should consider it soon after planting.
Following this advice and guidance should put your fruit trees on the right path towards yields in the future. These first initial months are crucial towards the long-term health of your trees. Check-in often to ensure your trees are doing well.
And to see on-going progress with my fruit trees, be sure to follow our Unit Facebook Page.
Grant