Keep worms warm for winter vermicomposting
By Austin Little, horticulture educator
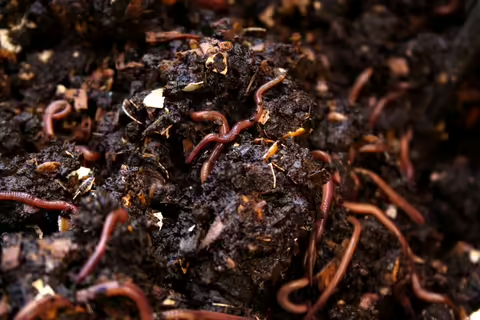
Vermicomposting or vermiculture, which is also known as worm farming, is the practice of keeping worms to produce worm castings or vermicompost. Vermicomposting is a natural process where worms digest organic matter and produce a waste product that is high in plant-available nutrients, beneficial microbes, and organic matter.
Gardeners have been using vermicompost to improve soil and plant health for decades which is why it’s known as black gold.
Worm farmers often prefer to keep their worm bins outdoors or in an outbuilding. This is fine during the warm season as long as they are kept out of direct sunlight. However, in the months of winter, extra measures are needed to ensure the current worm population’s survival.
Larger compost bins will maintain more of their internal heat and will give a deeper space for worms to migrate into if it gets a little too cold; smaller bins will need more protection. If you plan on keeping your bins outside, they can be insulated with blankets, burlap, straw, insulation foam, or other material as long as some gaps are left for air. If worms are kept outside and insulated, they will need less food over the winter months. The typical rate of feeding is 1lb of scraps per 1lb of worms a day, but in colder temperatures, this will be significantly reduced.
Another good option is to bring the bin indoors, where it will be much easier to maintain a steady temperature above 55°F. If worms will be stored in a garage or cold basement, keep them off cold floors. With proper safety precautions, a seed starter heating pad or space heater can be used to maintain temperatures and avoid freezing.
Easier yet, keep worm bins inside where they can be kept in a heated basement or closet.
The most recommended species of worm for vermicomposting, Red Wrigglers (Eisenia foetida), are most active at temperatures between 55°F to 77°F. While worms don’t exactly hibernate, they do slow down at cooler temperatures and will die when it gets close to freezing which is why it’s important to maintain a minimum temperature of around 55°F.
A great way to keep an eye on the temperature of the bin is to use a compost thermometer, which is great for other compost projects as well.
Worm bins should not smell bad. If they do, it usually means they are being overfed or there is too much moisture in the bin.
It’s also important to check on them every week or so to ensure they have adequate bedding and moisture. Due to the drier air conditions in winter, the bedding which typically consists of shredded paper or cardboard should be spritzed with water and moved around a bit to ensure airflow and moisture.
Whether keeping worms outdoors or bringing them in for the winter months, keeping them warm is key to having a happy worm that will produce nutrient-rich vermicompost for your garden.
Gardener's Corner is a quarterly newsletter from the Illinois Extension team of horticulture experts. Each issue highlights best practices that will make your houseplants, landscape or garden shine in any season.
How will you grow? Join the Gardener’s Corner email list and get direct access to timely tips!
Watering trees, shrubs in the fall and winter is a balancing act
By Gemini Bhalsod, horticulture educator.
After this year’s summer drought in Illinois, it is more important than ever to monitor soil moisture conditions and water trees and shrubs going into winter. Drought conditions in the late fall, along with dry air and low soil moisture, can lead to plant damage if no supplemental water is provided.
If soil is dry, homeowners should consider watering their trees and shrubs this fall and winter. Plants under water stress are more susceptible to insects and diseases. They can also experience injuries to roots or foliage.
Before watering, check the soil moisture. Monitor the moisture levels about once a week. Dig a small hole under the tree's drip line, 4 to 6 inches is enough. Feel for moisture. If the soil is dry, the tree should be watered. This little bit of consistent effort will pay off in the long run.
In particular, newly fall-planted trees, shrubs, and perennials should be monitored and watered late into the season, since they do not have as much time to develop extensive root systems as anything planted in the spring.
Pay attention to evergreens and shallow-rooted trees such as birches and maples. Some shallow-rooted trees can be identified by roots breaking the surface of the soil. Evergreens do not go dormant in the winter and are still actively respiring and lose water through their needles. Dormant trees respire at lower rates. Since soil insulates and cools down later in the year than the air temperature, roots stay warmer longer and respire at higher rates than the above-ground parts, the trunk, and branches, of deciduous trees after their leaves drop.
Only water when the temperature is above 40°F. In some places, that could be as late as the end of December. Stop supplemental watering after the ground freezes because at this point the trees cannot absorb water through the frozen soil.
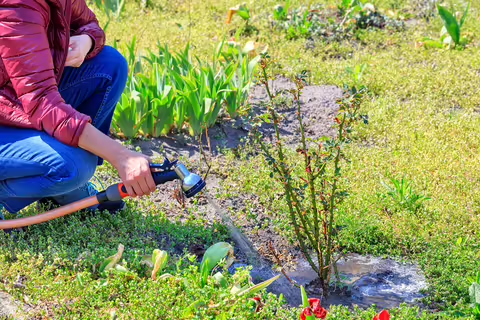
To water, use a soaker hose to provide a slow stream of water. Soil should be moist, but not waterlogged. This method results in less runoff and the water is more likely to be absorbed by the root zone. If your hose is stored away and your tree or shrub is small, pour water very slowly or drill a 1/8-inch hole at the bottom of a 5-gallon bucket and fill that with water.
Water at the tree’s drip line and not right against the base. To conserve water, start with newly planted trees and shrubs weekly and then large and established trees once a month if it is a dry period.
Avoid fertilizer, which stimulates late-season growth, and instead, consider applying mulch. Mulch can help conserve moisture over the winter months. Apply mulch about 2 to 4 inches away from the base of the tree all the way to the drip line in a doughnut shape around the trunk, leaving 2-to 4 inches of space in between. As always, planting hardy species or cultivars with deep roots is best since they are more likely to be able to survive temperature fluctuations and prolonged periods of cold.
Gardener's Corner is a quarterly newsletter from the Illinois Extension team of horticulture experts. Each issue highlights best practices that will make your houseplants, landscape or garden shine in any season.
How will you grow? Join the Gardener’s Corner email list and get direct access to timely tips!
DIY bottle terrariums make great holiday gift
By Bruce J. Black, horticulture educator
Winter is that time of year where gardeners rest and plan for spring. But with the holidays, why not make loved ones plant gifts?
Impossible bottles, or bottles with an object inside that doesn’t seem like it can fit through the bottle’s mouth, have been things of wonder throughout history with ships or decks of cards being built inside bottles. Bottle terrariums are similar feats of wonder using plants. Terrariums are either tightly closed or open transparent containers with plants inside. Credited for inventing terrariums, Dr. Nathaniel Bagshaw Ward used hermetically sealed glass containers with soil inside to better observe the change of the chrysalis of sphinx moths.
Bottle terrariums are a creative way to use plants. Recycling old bottles and turning them into works of art is fun and easy.
When designing a bottle terrarium there are a few questions to think about first. Will it be an open or closed terrarium? What type of container is wanted? What is the theme? What plants –tall or small –will be used? Are there any additional decorations?
Closed terrariums will act like a greenhouse and be a mini-ecosystem. Bottle terrariums with caps, corks, or tightly fitting lids will trap the moisture inside where it will cycle. Open containers are more of a display allowing for larger and taller plants.
Any transparent container can be used as a terrarium. Glass and plastic are the two most common mediums. Besides bottles, commonly used items are fish bowls, fish tanks, jugs, jars, or light bulbs.
The best part is coming up with a theme. Developing a theme based on an event, season, movie, or genre can help to tell a story and make your terrarium unique.
To build a terrarium, first, start off with a drainage material such as gravel or stones. This allows water to pool without soaking the soil. When using foraged rocks or shells, boil them for five minutes at a rolling boil to sterilize them and prevent disease or insect issues. Allow them to cool before using.
Add activated charcoal to help eliminate chemicals that could harm the plants. Activated charcoal can be found at garden centers. It absorbs any unwanted chemicals that would be taken up by the plant and harm it. Next, add a pre-moistened potting mix suitable for the chosen plants. The gravel, activated charcoal, and potting mix should make up about a quarter of the container volume.
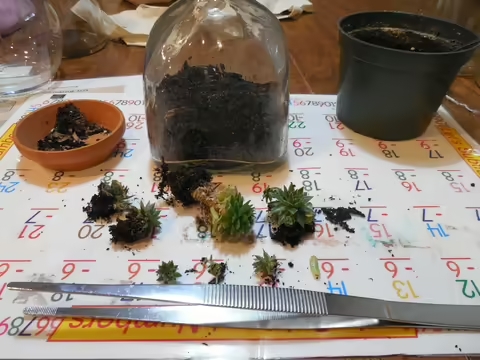
Many plant types such as Kalanchoe, Sempervivum, Crassula, Echeveria, Sedum can be used in terrariums. To add the plants, skewers, pipe cleaners, and long-handled tweezers may be needed depending on the size of the container’s opening. When placing plants, don’t let the foliage touch the sides of the container and wipe any debris off plants with a clean paintbrush.
Clean any figures, toys, glass, pebbles, or ceramic structures with an alcohol or 10% bleach solution and allow them to dry. Dried flowers or wood may also add to the story. Supplies can be purchased from dollar stores, craft shops, and local garden centers.
To care for the new terrarium, place it near a south or western facing window or near supplemental lighting, not in direct light. Most terrarium plants are in the medium-light requirement category. Watering will vary. Closed, tightly sealed containers will only need to be watered every four to six months. Wilting plants and bottles with no condensation are a sign watering is needed.
Open containers need to be watered more often depending on humidity levels in the home. For maintenance, don’t overwater, remove any dying leaves, turn the container weekly to keep plants growing normally, and prune or pinch plants that get tall.
Making terrariums is a great family or friends’ activity. I enjoy making them with youth and they make great gifts with the holidays coming up.
For more information, watch a Creating a Bottle Terrarium webinar at go.illinois.edu/BottleTerrarium.
Gardener's Corner is a quarterly newsletter from the Illinois Extension team of horticulture experts. Each issue highlights best practices that will make your houseplants, landscape or garden shine in any season.
How will you grow? Join the Gardener’s Corner email list and get direct access to timely tips!
Low-maintenance, winter blooming holiday cacti are gift that keep on giving
By Kelly Allsup, horticulture educator
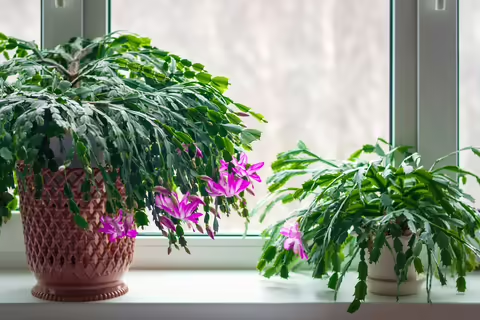
With their vibrant, floral displays and low-maintenance needs, holiday cacti are a great holiday gift. Thanksgiving, Christmas, and Easter cactus are each different species. They bloom reliably each year without much upkeep.
Every December, one plant in my office comes to life despite the minimal care it receives. The plant has remained in the 6-inch pot for nine years now, receives water when it is dry, and has been used prolifically in propagation workshops for Master Gardeners.
Holiday cacti are easily distinguished by the stem margins as well as timing of flowering. These cacti don't have true leaves; instead, they have flattened stem segments that are used in propagation to grow new plants.
Illinois Extension Horticulture Educator Jennifer Fishburn says holiday cacti are the gift that keep on giving. They are often passed down from generation to generation as family heirlooms because they are so long-lived.
Thanksgiving cactus, Schlumbergera truncate, has two to four saw-toothed projections resembling crab claws. Flowers are produced from late November to late December. Flower colors include white, red, lavender, salmon, orange, and yellow.
Thanksgiving cacti are often forced into bloom and sold at Christmas time, and are often misnamed Christmas cacti.
Christmas cactus, Schlumbergera x buckleyi, has scalloped or rounded stem margins. Flowers are generally showy from late December through March. The flowers form at the tips of segments.
Easter cactus, Rhipsalidopsis gaertneri, has four to six rounded teeth along the stem edges and brownish hairs at the leaf tips. Flowers in shades of pink or red flowers appear March through May. Easter cactus may re-bloom.
Thanksgiving and Christmas cacti blooms are triggered by day length. They bloom when they receive 12 to 15 hours of darkness a day for five to six weeks and are exposed to cool night temperatures.
Holiday cacti are commonly used to demonstrate propagation because leaf cuttings, rather than stem cuttings, can be used to generate new plants. However, cacti do not have true leaves. The leaves are actually stems called cladophylls.
Despite being a cactus, these plants are native to the tropical rain forest and are watered regularly with other houseplants. Water cacti when the top inch of soil is dry to the touch.
To gift holiday cacti, look for 4, 6, and 8-inch pots at garden centers. Find a decorative container with a hole in the bottom of the same size. Remember these cacti are long-lived and can thrive in this pot for the next 15 years.
When transporting cacti, wrap and bag plants to prevent exposure to cold temperatures as the buds will be severely damaged by time spent outside.
Holiday cacti can bloom profusely for a month or two and may even bloom twice a year. While in bloom, use cacti as decoration, keep them away from heat sources, and water regularly.
As a houseplant, place in front of a window and water regularly. In the summer, these tropical houseplants can go outside in a partially shaded area. Between April and October, fertilize every four weeks with a complete houseplant fertilizer.
Gardener's Corner is a quarterly newsletter from the Illinois Extension team of horticulture experts. Each issue highlights best practices that will make your houseplants, landscape or garden shine in any season.
How will you grow? Join the Gardener’s Corner email list and get direct access to timely tips!
Poinsettias add a rainbow of color options to holiday décor
By Andrew Holsinger, horticulture educator
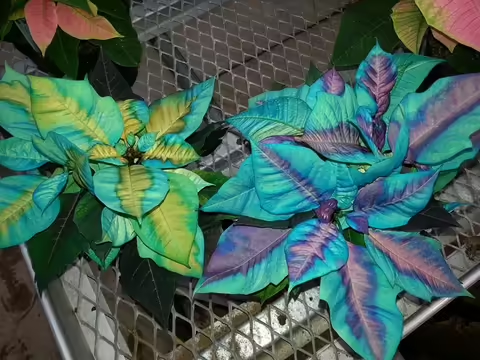
With their bright red blooms, Poinsettia’s are a holiday tradition, but buyers don’t have to limit their selection to one color. This winter, celebrate and decorate with a rainbow of Poinsettias.
University of Illinois Extension Horticulture Educator Andrew Holsinger says there are plenty of new Poinsettia hues to choose from.
Beyond the traditional natural shades of red there are many other colors that can be sought after when purchasing a Poinsettia. If you are like me, you don’t want to limit your selection to the traditional red.
A number of natural colors are available including pink, white, yellow, and salmon. Any blue and purple Poinsettias are actually cream-colored varieties that have been spray painted.
Poinsettia’s color come from bracts which are actually modified leaves. These bracts are prompted to change color in response to shorter winter daylight. While bracts of some varieties of Poinsettia are uniformly colored, others offer patterns that add to the uniqueness of these plants.
Some new and unique varieties to look for are ‘Orange Spice,’ ‘Ice Punch,’ ‘Peppermint Twist,' ‘Winter Rose,’ ‘Red Winter Rose,’ and ‘Red Glitter.’
Poinsettias are compact plants that when properly cared for have a long-lasting display of color. Keeping them at the ideal temperature of 65⁰F to 70⁰F during the day will keep the plants healthy and colors more vibrant. Single plants can be used as tabletop floral display. A mass display of Poinsettias for makes a stunning wave of holiday color.
After the holidays are over, Poinsettias can be kept for the next season. To ‘rebloom’ a Poinsettia, bring it inside after summer and provide the proper lighting conditions to trigger the coloring.
Artificially colored Poinsettia will not carry over their dyed color.
When choosing plants, select Poinsettias with cyathia that are green-tipped or red-tipped. Instead of the colorful bracts, The cyathia are the true flowers of these plants. The greenish-yellow flowers are clustered at the center of the bracts. The cyathia can be examined when purchasing a Poinsettia to determine freshness and duration of bloom. Plants with yellow cyathia or pollen indicate that the plant is past its prime.
A healthy plant will need an appropriate location. Provide adequate light but not direct sun. Avoid drafts from windows or heating vents. Make sure that adequate drainage is provided. Foil wrappings often foil the success of keeping Poinsettias for the duration of the holiday season since they keep the container from fully draining.
When decorating your home, a fun crafty project can be to paint Poinsettias. Start with a cream-colored variety and obtain a dye suited used for floral application. Make sure to protect tabletops when applying special floral spray paints.
Explore more about how to care for Poinsettias with a University of Illinois Extension infosheet https://go.illinois.edu/PoinsettiaCare.
Gardener's Corner is a quarterly newsletter from the Illinois Extension team of horticulture experts. Each issue highlights best practices that will make your houseplants, landscape or garden shine in any season.
How will you grow? Join the Gardener’s Corner email list and get direct access to timely tips!
Give Christmas trees a second life after the holidays
By Ken Johnson, horticulture educator
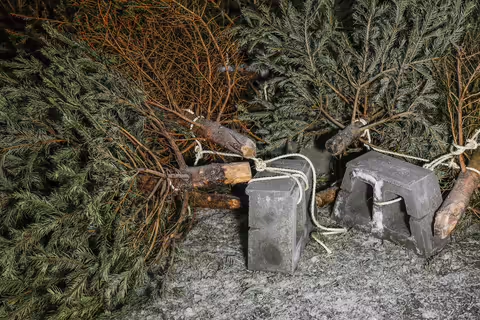
Once holidays are over, the Christmas trees tend to come down. Instead of hauling this year’s tree to the dump or having the city pick it up, consider repurposing it in your landscape.
Ken Johnson says one popular use for Christmas trees after the holidays is to use them to block wind that can hinder feeding birds.
Trees can be used as a windbreak by placing them to the northwest of feeders to block where our prevailing winds come from this time of year. Not only will this help protect birds from the wind as they feed, but it can also prevent birdseed from blowing out of feeders.
Additionally, trees can be turned into a large festive bird feeder. Anchor the tree to the ground using a steel fence post. Then decorate it with strings of popcorn and/or cranberries, as well as pinecones smeared with peanut butter and sunflower seeds, suet, or chopped fruit in a mesh bag.
Christmas trees can also be used to create habitat for other wildlife in the form of brush piles. Place brush piles near field borders and in woodland areas along with other brush to provide cover for wildlife. Before building a brush pile, check for local ordinances that may prohibit them.
Another use for your Christmas tree includes providing a habitat for aquatic wildlife. Trees can be sunk in ponds to provide shelter for fish and other aquatic life. A single tree won’t offer much habitat, so it’s best to group three or four together. Trees should be sunk vertically using rocks or concrete blocks as anchors.
In the garden, evergreen branches and needles can be used as mulches to cover perennial plants during the winter. These mulches are light and won't pack or suffocate the roots of the plants they are protecting. Trees can also be chipped and used as mulch in the garden to help reduce weed problems, moderate soil temperature, and retain moisture.
Your Christmas tree can also be a good source of wood for an outdoor fire. The branches and needles are good for getting fires started, and the trunk can be used as fuel.
Never burn a Christmas tree in a fireplace or woodstove. It may contribute to creosote buildup and could cause a chimney fire.
Finally, trees can be used in a variety of crafty ways. The needles can be used to make potpourri. When dry, the trunk can be cut into wooden discs and used as coasters or trivets, used to edge garden beds, or decorated and turned into ornaments.
Regardless of how a tree is reused after the holidays, make sure to remove all ornaments and tinsel.
Gardener's Corner is a quarterly newsletter from the Illinois Extension team of horticulture experts. Each issue highlights best practices that will make your houseplants, landscape or garden shine in any season.
How will you grow? Join the Gardener’s Corner email list and get direct access to timely tips!
Use DIY kokedama moss balls to grow houseplants
By Brittnay Haag, horticulture educator
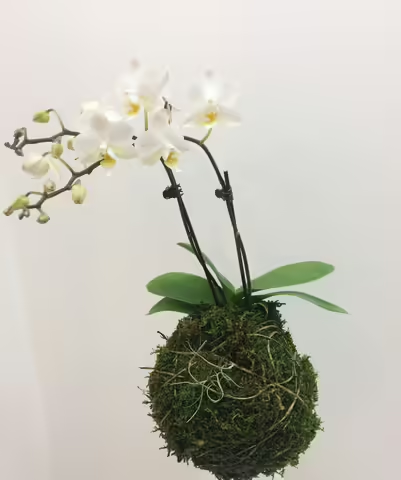
Free your houseplants’ roots this winter by creating organic art for your home through kokedama, a form of Japanese bonsai, where plants are grown in a special soil mix and wrapped in moss. Kokedama is a uniquely beautiful way to grow houseplants in a non-traditional way.
Kokedamas can be displayed on decorative trays or dishes, antique bowls or saucers, or attached to a piece of driftwood. They can also be hung with decorative string or wire from a window or ceiling, creating a string garden with more than more kokedama. These beautiful, natural planters make a great gift or can add a little green to your winter space.
Many different kinds of plants can successfully be grown as kokedama. An established houseplant that needs to be repotted, cuttings of houseplants with newly developed roots, or seasonal plants to decorate your space can all be planted in the moss balls.
Ideal plants would be ones that can grow in drier conditions, such as ferns, philodendron, dracaena, spider plants, and even small orchids. Succulents can also be planted in moss balls but will require less water.
Kokedamas can be created with any size plant. The size of the ball will just vary to accommodate the root mass of the plant.
Needed Materials
- Lightweight potting mix or peat moss
- Akadama, a coarse clay-like mineral used as bonsai tree soil.
- Moss, sheet or Spanish
- String
- Scissors
- Water
Directions
- Start by soaking the moss in a bucket of water for one hour to rehydrate the organic material. Then, squeeze out the excess liquid and set it aside.
- Combine the soil mixture of 70% potting mix or peat moss and 30% bonsai soil to create the ball. Slowly add water to the mixture until it can be pressed firmly into a ball without falling apart.
- Remove the plant from its container and gently break apart the root ball and remove any excess soil, exposing most of the roots.
- Create a hole in the soil ball large enough to fit the roots of the plant inside. You can also gently break the soil ball into two pieces, lay the roots on one side, and push the soil back together around the roots.
- Press the moss around the soil ball until it is fully covered. Or, create a thin layer of moss on a flat surface, set the ball in the middle, and wrap the moss around the ball.
- Use the string to attach the moss to the ball. Secure the string to the ball and wrap it randomly around the ball in every direction to keep the moss in place. Tie it off tightly to create a firm, sturdy ball.
Proper watering will be key to keeping your kokedama alive. Stick your finger in the top of the ball near the base of the plant to feel if the soil is dry. The weight of the ball will also tell you. Is it light? It is time to water.
To water the kokedama, fill a bucket or sink with lukewarm water. Gently push the moss ball into the water so it starts to absorb the water. Soak the completely submerged ball in the water for 15 to 20 minutes. Drain the water and squeeze the moss ball to remove excess water, and let it drip dry before returning it to its decorative space. Mist the moss ball between watering to keep it from completely drying out.
Gardener's Corner is a quarterly newsletter from the Illinois Extension team of horticulture experts. Each issue highlights best practices that will make your houseplants, landscape or garden shine in any season.
How will you grow? Join the Gardener’s Corner email list and get direct access to timely tips!
Plant cover crops at home for healthier soils
By Nicole Flowers-Kimmerle, horticulture educator
Healthy soil is essential for healthy plants. Using cover crops in the home garden is one way to promote soil health.
Cover crops are non-harvested crops that add organic matter to the soil, transfer nitrogen to plants, and break up heavy clay or compacted soil. They are commonly used in agriculture, but also have a place in the home garden.
Cover crops are planted before a garden is planted or after harvest. Cover crops can also be planted in areas that are unused for the season. Using cover crops in the home garden has many benefits.
Improving soil structure, drawing nutrients up from deep in the soil, and increasing soil fertility are just a few ways cover crops to improve soil health. Suppression of weeds, habitat for beneficial insects, increased biodiversity are other ways cover crops work for the garden's good.
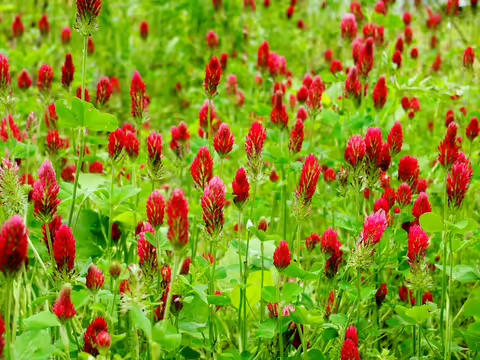
There are two types of cover crops to consider, warm-season and cool-season. Warm-season cover crops are planted in spring or summer before the garden is planted or in a fallow area. Buckwheat, cowpeas, and crimson clover are warm-season are common cover crops used in the home garden.
Cool-season cover crops are planted in late summer or early fall after the vegetables are harvested. Oats, winter wheat, winter rye, and crimson clover can be used as cool-season cover crops.
Keep in mind that these cool-season cover crops need to germinate and grow before winter temperatures.
Crimson clover and cowpeas are legumes that take nitrogen from the air and convert it to a form usable by plants. Notice that crimson clover can be used as either a warm-season or cool-season cover crop.
When planting a cover crop, there is no need to cover the seeds. Allow the plants to grow until the flowering stage. Once flowering begins, either mow or cut down as close to the ground as possible to prevent seed formation. If the crop is cut down too early, it may regrow. If it is cut down too late, it may reseed.
After cutting down the cover crop, leave the cut portion as a mulch on top of the soil or till it into the ground. Both options have their benefits. Leaving the plant material as a mulch can suppress weeds. Tilling can help incorporate the organic matter into the soil, but it also disrupts the delicate soil ecosystem.
Each garden is unique, so you must decide what is suitable for each situation.
Winter hardy cover crops or crops not killed by the mowing could be tilled into the soil. A cover crop that is killed by winter temperatures would not require tilling the debris into the soil.
It is important to follow the “mow, wait, plant” rule when using cover crops. After mowing a cover crop, leave the plant debris to sit for two to four weeks before planting anything else. The residue needs to break down and the flush of microbial activity needs to slow before new plants start growing.
Gardener's Corner is a quarterly newsletter from the Illinois Extension team of horticulture experts. Each issue highlights best practices that will make your houseplants, landscape or garden shine in any season.
How will you grow? Join the Gardener’s Corner email list and get direct access to timely tips!
Garden catalog season gives gardeners chance to explore, shop for next year's seeds
By Richard Hentschel, horticulture educator
January begins the annual flight of vegetable, flower, and fruit tree catalogs to your mailbox or inbox. Depending on your level of gardening, the catalogs are starting to arrive frequently and en mass.
It used to be you would get either a vegetable catalog or a fruit catalog or flower catalog. Many catalogs now contain something for everyone, including the garden gadget addicts.
Illinois gardeners should start by looking for plants that thrive in USDA Hardiness Zone 5. Many catalogs offer heirloom vegetables, flowers, and fruit trees. These heirloom varieties can be some of the best tasting and or more unusual looking fruits and vegetables we get to eat.
They are called heirloom since they have had no or very little traditional breeding. This can mean they will have more disease problems though and often less production as well.
With all the plant breeding work going on, vegetables can take on new colors that are a bit outside the lines. Consider a blue potato or perhaps the more acceptable colors of green peppers being yellow, red, purple, orange. These look great in salads and other dishes. It used to be that Swiss chard was green, but it is now also available in shades of pink, orange, yellow, gold, white and purple. Newer varieties have a slenderer stalk and can be used to brighten up salads or cooked as you would use spinach.
Small fruits such as strawberries come in a variety of shades of red now. More small fruits options are also now available. Plant breeders have had success transforming smaller fruiting shrubs such as currants, gooseberries, and Aronia into well performing plants for the home garden. Rhubarb and asparagus are great additions to the garden.
Technology has been transforming gardening. There is a garden gadget for everyone. Gardeners who start their own seeds will find a variety of pots, seed starting soil mixes, markers, and more. You can start your seeds in flats individual cell packs like you see when you buy your annual flowers, or even expanding pellets.
Planting can be done in pots made of plastic, bio-renewable materials, or an organic fiber. Additional accessories that make seed starting easier include warming mats in sizes from one six pack to a full tray, plant stands with growing lights and self-watering trays, or a variety of temporary outdoor structures to use to grow out and harden vegetable plants before they go into the garden.
Hand tools are forever evolving each with their own unique characteristics. Choose wisely and choose what feels comfortable for you. Your gardening style changes as you age, so will your tools.
If your mailbox is not quite full enough, go online and sign up for a few more. It is quick and easy
Gardener's Corner is a quarterly newsletter from the Illinois Extension team of horticulture experts. Each issue highlights best practices that will make your houseplants, landscape or garden shine in any season.
How will you grow? Join the Gardener’s Corner email list and get direct access to timely tips!
Trim trees, shrubs in the dormant season for stronger, healthier plants
By Sarah Vogel, horticulture educator
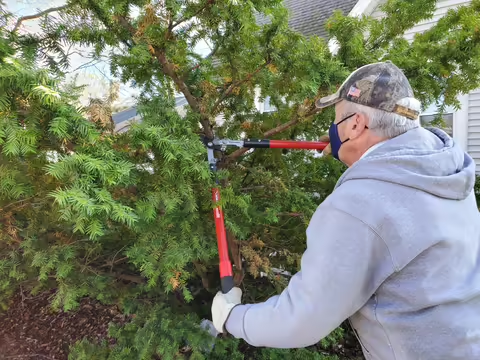
Throughout the growing season, gardeners and arborists talk about the benefits of pruning woody ornamentals while they are dormant, and that time is almost here.
Pruning can seem like a daunting task, but it is an important cultural practice for the health and vigor of many trees and shrubs. Pruning is done to reduce the size and shape of the plant, increase flower or fruit production, and promote sound structure.
The correct time to prune deciduous shrubs and trees is determined by the plant’s growth habit, bloom time, and health or condition. Timing will depend on the species, but any time is a good time to remove dead, dying, or broken branches. Be sure to sanitize tools between plants with a 10% bleach solution or undiluted 70% isopropyl alcohol. Sanitize between each cut if a disease is suspected.
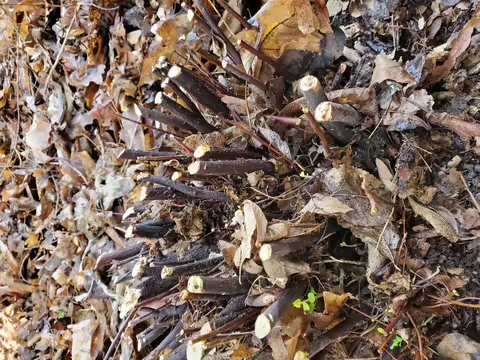
Spring flowering shrubs, such as lilac or forsythia, will bloom on the growth from the previous last growing season, sometimes called "old wood". The best time to prune a healthy plant is immediately after flowering in spring. Overgrown shrubs may need more extensive pruning through rejuvenation or renewal methods in late winter or early spring. Heavy pruning methods may lead to fewer blooms for a few years, but will improve the overall health of the shrub.
Summer blooming shrubs, or those that bloom after July 1, produce blooms on the current year’s growth. These are best pruned in late winter or early spring.
Do not prune deciduous shrubs in late summer as that will encourage a flush of new growth that will not have the opportunity to harden off before winter, leaving the plant susceptible to frost damage and dieback
Many of the same rules for shrubs also apply to deciduous trees. Most will respond well to late winter pruning, including fruit trees. Performing this task on trees in the dormant season gives the pruner an increased visibility of the tree’s shape without any leaves and enough time for proper wound closure for the plant. When branches are cut correctly at a node or at the branch collar, the plant will seal wounds properly to prevent the spread of decay and entry for potential pests and pathogens.
There are some exceptions to early spring pruning. To reduce the spread of oak wilt disease, oaks should not be pruned from March through October. River birch will respond best to cuts made in late fall or early winter after leaves have fallen and when sap flow is reduced.
Pruning techniques on evergreens will vary depending on the species and desired effect. Fall pruning is not recommended for evergreens, as any new growth will be susceptible to winter injury. Evergreen shrubs such as juniper and yew can be pruned in March or April before new growth emerges. Evergreen trees such as pine, spruce, and fir generally require very little pruning, and removing lower branches is not advisable as it compromises the structural integrity of the tree.
Spruce and fir trees have lateral buds on the newest growth. These are buds that grow from the sides of the branch, not the ends. To create a more dense form, prune back to these lateral buds in early spring. Pines only grow from terminal buds at the end of the branch. Pines are pruned in spring or early summer at the candle stage by removing two-thirds of the elongated bud. Do not cut branches back to older growth as they will not develop new growth from those areas.
Relieve the winter blues by choosing the next calm, sunny, 40-degree day to put on boots and get some sunshine. The improved health of your trees and shrubs will be worth it.
Gardener's Corner is a quarterly newsletter from the Illinois Extension team of horticulture experts. Each issue highlights best practices that will make your houseplants, landscape or garden shine in any season.
How will you grow? Join the Gardener’s Corner email list and get direct access to timely tips!
